|
|
Webpage Note: Thumbnails are used in this article for the benefit of those that have dial-up internet access. To see the full sized image you can click on a thumbnail
which will open another window with the larger picture. JavaScript is used to open these windows therefore JavaScript must be enabled and popups allowed from this site
for this to work properly.
|
Introduction:
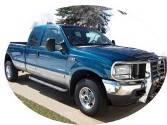
Well, it was time to do rear hub seals on my truck so I took some pictures and am doing another how to. Hope this helps people!
This is for a 2002 F-350 10.5" rear. Please consult your appropriate shop manuals to get your exact torque specs for fasteners...
|
|
Disclaimer:
Ford-trucks and I are not responsible for anything which can result from mis installation or other issues that may arise from following this tutorial.
|
Tools and Parts that you will need (double check PN with your dealer, these are for 2002):
A 150 ft lb torque wrench gear lube 2 jaw puller and step plateFord Rear hub socket (available at parts houses. Autozone didn't have one) Rear hub seals (I'd do both. My drivers failed and passengers was starting to weep) PN: 2C3Z-1177-AB (2 needed)O-rings for axle shaft PN: E5TZ-4A331-A (2 needed)Ford spec thread locker (i.e. Loc-tite) Bearing repack (grease) Jack and standsRear park brake shoes (Kit ran me $97 from dealer) PN:F812-2648-CA (1 needed)brake cleaner
Note: Although the park brake shoes aren't cheap, buy them because usually your hub seals will leak gear lube all over them rendering them useless.
|
Before you begin:
First, buy all your parts. The hub seals are PN: 2C3Z-1177-AB while the o-rings are PN E5TZ-4A331-A. Hub seals run about $16 while the o rings are about $1.50.
Here are PN's and pictures showing fastener sizes:
|
[Click on thumbnail to see a larger image]
|
Let's get started...
Nut and Bolt sizes:
|
[Click on thumbnail to see a larger image]
|
|
Don't mind all of the brake fluid. I was flushing my system.
|
[Click on thumbnail to see a larger image]
|
SAFELY jack the truck up and use jack stands.
Note: Yes, I am using a jack. My jack stands couldn't be found.
DO NOT DO THIS. NEVER WORK ON A VEHICLE SUPPORTED BY A JACK. I had to get the job done.
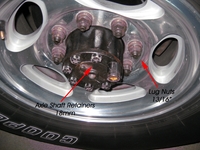
Remove the fancy lug nut covers using a large screw driver / end of lug wrench. Place the cover upside down to place all of the fasteners in.
Loosen the lug nuts and remove wheel assembly.
|
[Click on thumbnail to see a larger image]

|
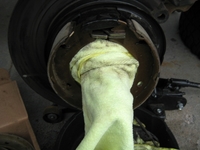
Place a drain pan below the axle shaft to catch any oil that may drain when the axle is pulled.
Loosen and remove the axle shaft retaining bolts and pull out the axle shaft.
It is in there tight but will come out. It will leak a little gear lube so be watchful.
|
[Click on thumbnail to see a larger image]
|
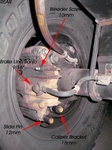
Remove the rear brake caliper and bracket. Be careful, it's kind of heavy. Set aside but do NOT hang by brake hose, use some
wire and secure the caliper to the frame or axle so the hose does not have any tension on it.
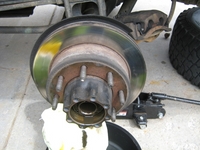
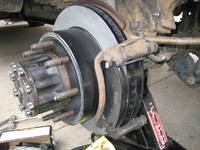
Remove the brake disc rotor assembly.
|
[Click on thumbnail to see a larger image]
|
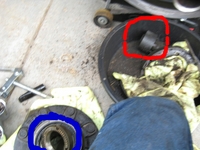
Using the special socket, loosen the hub nut and remove it. If it falls apart replace the nut. Also watch that the inner bearing doesn't fall onto the ground.
Sorry I don't have a better picture of the socket. The socket is circled in red, spindle nut is in blue
|
[Click on thumbnail to see a larger image]
|
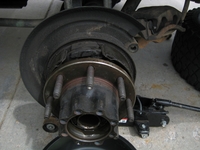
Remove the hub using a puller and step plate. I didn't need either. My hub came off with a little prying from behind.
|
[Click on thumbnail to see a larger image]
|
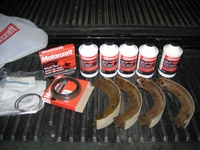
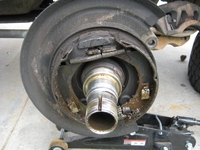
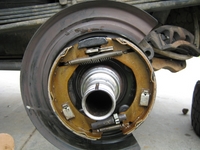
Remove the retainers for the brake shoes as well as the retaining springs. Using brake cleaner, clean really well where any lube is present. You don't want to ruin your
new brake shoes with grease or axle lube.Take note that the long spring goes on top of the fat one so as to not rub the hub. When I replaced the rear shoes, I covered the spindle
so as not to scratch it. The springs tend to cause the shoe brackets to make contact with the spindle.
|
[Click on thumbnail to see a larger image]
|
|
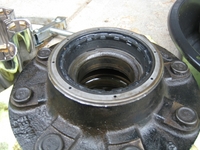
Repack bearings with an appropriate grease and remove the old hub seal.
Drive in the new hub seal, making sure it bottoms out properly.
IMPORTANT NOTE: Make sure you replace the inner bearing before you drive the seal in.
I almost didn't. These seals are NOT removable once driven into place.
|
[Click on thumbnail to see a larger image]
|
Coat the spindle with a bit of axle lube and fill the cavity with a little lubricant. Place the hub onto the spindle taking care not to nick the new seal on the threads of the spindle.
Place the outer bearing back in place making sure it is seated fully, then put on the spindle nut and tighten down to 60 ft-lbs, then back off nut 7 clicks for
used bearings. (CHECK YOUR TORQUE SPECS. These are for an 02 and 10.5" rear end...Yours MAY be different!)
|
[Click on thumbnail to see a larger image]
|
Replace the axle shaft and fasteners using Ford spec thread locker, as well as replacing the o-ring on axle shaft end )
|
[Click on thumbnail to see a larger image]
|
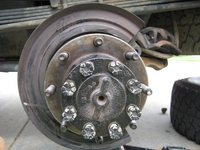
Replace the rotor and caliper bracket using proper torque specs
|
[Click on thumbnail to see a larger image]
|
Clean and grease the slide pins with slide pin lubricant, replace the caliper using proper torque specs, replace the wheel assembly,
tighten lugs to torque, THEN tighten axle shaft retaining bolts.
|
[Click on thumbnail to see a larger image]
|
|
Congratulations. You have replaced you rear hub seal(s). The other side is the same.
NOTE: Some models have left hand threads.
|
Back to guzzle's Powerstroke Maintenance Index |

)
)
)
)
)
)
)
)
)
)
)
)
)
)