|
|
|
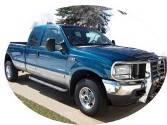
During a recent trip while pulling a 3000lb boat with no trailer brakes over the Rocky Mountains, I was forced to do some hard
braking when exiting the interstate on a couple of offramps when going down a 6% grade. I had been experiencing some rotor
warpage ever since I bought the truck but the heat generated from the hard factory brake pads during hard braking really
intensified during this trip. During the hard braking, the steering wheel would rapidly pull back and forth +/- a good 5ş. The
steering wheel action pretty well narrowed it down to a front brake problem.
The previous owner had the rotors turned under warranty but the warpage had quickly returned due to Ford's choice of pads.
I decided it was time to go to the aftermarket and get rid of the factory front rotors and brake pads. It did not take much
research to find that most Powerstroke owners recommend the Cryo Powerslot rotors in combination with Hawk Pads.
Since I seldom tow more than about 5,000 lbs it was recommended that I go with the Hawk LTS Compound Front Pads.
Now after a few hundred miles on the new rotors, I could not be happier with the choice I
made. Just make sure that you follow Powerslot's directions for seating the brakes to the letter.
Stopping power has doubled, no front end shaking or pulsations when doing hard or easy braking. I have not towed the boat
over the Rockies since installing these rotors and pads but feel that they will perform as well as other owners have testified.
Got a question? Contact me on my DieselOrings.com webshop CONTACT PAGE
|
[Click on a thumbnail to see a larger image - -
javascript must be enabled and popups allowed from this site]
|
|
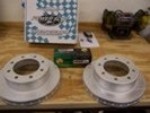 |
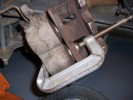
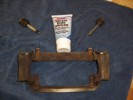
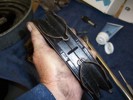
Parts that I used to perform the serviceCryo Powerslot rotors are sold as LEFT and RIGHT rotors. They are marked
on the rotors with an L and R. Make sure you use the correct rotor for each side. Left is the drivers' side wheel. The pads are sold in
two wheel sets, 4 pads to a box.
|
|
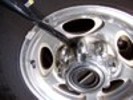 |
Remove the tireFirst of all SET THE PARKING BRAKE. It would also be a good idea to chock the rear
wheels to keep the vehicle from moving while jacking it up and positioning the jack stands.
Using the tire iron that came with the truck, the end is covered with a soft plastic jacket is designed
to pry off the hubcap without damaging the wheel surface.
|
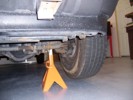 |
Before jacking the truck off the ground, break the lugs loose about 1/4 turn. Jack the wheel off the
ground and place a jack stand under the axle. Never work on the axle with the tire removed when only
supported by a jack. Lower
the jack down so the axle sits firmly on the jack stand. Finish removing the lug nuts and remove the rim and tire.
|
|
 |
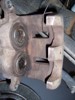
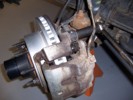
DisassemblyWith the tire off, the rotor and brake caliper is exposed.
|
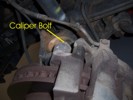 |
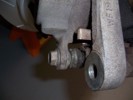
Using a large breaker bar and socket, brake the caliper mounting bolt loose. Do not remove the bolts all the way yet.
|
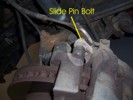 |
With the caliper bolts loose, break the caliper slide pin mounting bolts loose. Now you can remove the larger caliper mounting
bolts but make sure you are supporting the entire caliper so it does not drop to the floor and possibly damage the brake line or ABS
cable.
|
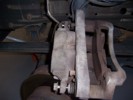 |
Slip the caliper off of the rotor and support it on the top of the rotor. Here you can see the caliper slide pins that are loose
from the caliper bracket.
|
 |
Remove the caliper slide pin bolts and remove the pin bracket and slide pins. This will expose both brake pads. Notice the two
pad springs that are fastened to the bottom of the brake pads. The springs are simply set in a small hole that is on each end on the
underside of the pad. When removing the brake pads, the springs will attempt to expand in the caliper bracket and is what holds the
brake pads in place when re-assembling.
|
 |
The outside brake pad on my Powerstroke had factory adhesive applied to the bracket and it took a light tap from a rubber
mallet to break it loose.
|
 |
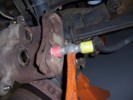
Using a large C-clamp and one of the old brake pads, compress the brake pistons into the caliper bracket. You could also
use a small block of wood instead of an old brake pad. Go slowly so not
to force brake fluid too quickly into the reservoir. I actually had a small amount of fluid squirt from the power steering pump while
performing this piston compression.
|
 |
Remove the slide pins from the slide pin bracket and lube with a quality silicone caliper grease. Do not use any grease that
is not designed as a high-temp, caliper grease; otherwise you will pay for it later! If your pins are frozen in the bores, apply heat to
the bracket and attempt to remove the pin. If you have difficulty with removing the pins, you may want to consider replacing them
with Ford's upgraded slide pins.
|
 |
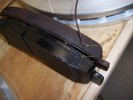
Suspend the caliper from the chassis with some heavy wire and clean the caliper with a brake cleaner that is safe for use
on the piston boots to remove any caked-on brake dust and road
grime. I also used a stiff nylon brush to assist in removing as much dirt as possible without completely removing the caliper
from the truck.
|
 |
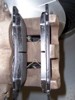
This pictures show where the holes in the brake pads for the pad retainer springs. This is a new Hawk pad next to one of the
factory brake pads.
|
 |
To assemble the new brake pads, grasp the new pads, face to face, in one hand and insert the retainer spring tabs into the
brake pads holes.
|
 |
Set the pads into the caliper bracket and re-attach the slide pin bracket.
|
 |
|
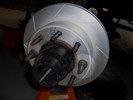 |
Place the new rotor on the hub. Make sure you use the 'L' rotor on the driver's side and the 'R' rotor on the passenger side.
Fasten the rotor to the hub using 2 lug nuts to keep the rotor from moving while mounting the caliper.
|
 |
Before mounting the caliper, check the slide pin boots one more time to assure that the boots are fastened securely over the
slide pin shoulder. Water and dirt can enter into the boot and quickly corrode the pin if the boots are not set properly.Also make
sure you have the slide pins in the correct position.
The slide pin with the notch needs to be installed
in the bore that will be at the top of the caliper (farthest from the ground) when the caliper is installed.
|
 |
Mount the caliper by slipping the brake pads over the rotor and replace the caliper mounting bolts. Torque the caliper mounting
bolts to 166 lbs/ft and torque the caliper slide pin bolts to 42 lbs/ft.
|
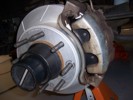 |
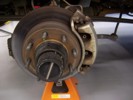
Remove the two lug nuts from the rotor. This is what the new rotor and pad installation should look like.
|
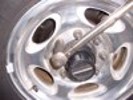 |
Install the rim and tire on the hub and torque to 150-165 lb-ft. Reinstall the hub cap. Start the engine and pump the brake
pedal to fill the caliper pistons. Put the truck in gear and test the brakes. Release the brake and slowly begin moving while
tapping the brakes to re-position the brake pads in the calipers.
|
|
Follow the Powerslot rotor instructions to seat the brakes. By doing so, you can expect to experience what the brakes should
feel like on a Powerstroke and feel confident on your stopping power. Wow, what a difference!
|
Back to guzzle's Powerstroke Maintenance Index |


)
)
)
)
)
)
)
)
)
)
)
)
)
)
)
)
)
)
)
)
)