|
|
|
Have you found fuel dripping under your truck and coating the front axle? No need to go to the Ford dealer and
spend $250 for them to fix it or pay more than $50.00 for a new drain valve assembly. Chances are that there is nothing wrong with the valve,
its just that the o-rings have swollen from the ULSD and no longer seal properly.
Here is another basic maintenance repair procedure that is
fairly straightforward, easy to do, takes only about 20 to 30 minutes and can save you $$$ over taking it in to a dealer to have this repair done.
|
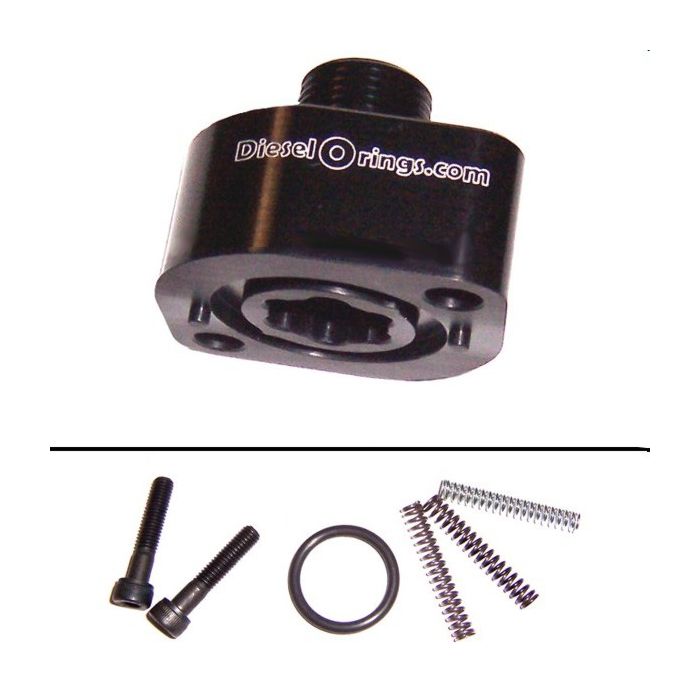
DieselOrings.com's replacement FPR Billet Housing
Replace the fragile cast FPR housing before you become
one of the unfortunate owners that have had the threads of the housing snap off into the brass nut.
|
 |
Got a question? Contact me on my DieselOrings.com webshop CONTACT PAGE
|
|
Parts and supplies to change the engine fuel filter |
|
|
|
-A short T-20 torx bit from a drill assortment bit kit |
|
-A 1/4" ratchet wrench with a socket that will hold the bit in place |
|
-2 ft of 3/8 hose to attach over the drain tube under the engine. |
|
-Drain pan/container to catch the fuel when emptying the fuel bowl |
|
-Shop rags |
[Click on a thumbnail to see a detailed image (800 x 600 pix) - -
javascript must be enabled and popups allowed from this site]
|
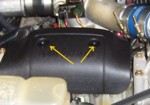 |
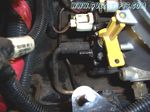
First, remove the plastic engine cover by unscrewing the two cap nuts. This will expose the fuel filter bowl that sits directly
in the center of the engine valley.
|
 |
Locate the fuel drain tube that leads from the rear of the fuel bowl on the top of the engine and
terminates under the passenger's side cylinder head, on the front of the engine. It is a 3/8" stainless steel tube tucked
close to the engine, directly over the front axle. Slip the 3/8" hose over the drain tube and route it to a drain pan/container
on the floor, under the engine. This will catch the fuel that will be drained from the fuel bowl during this service and keep from making
a mess on your shop floor.
|
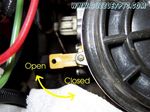 |
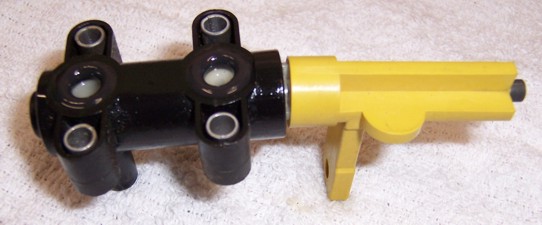
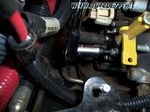
Rotate the yellow drain valve clockwise, 90 degrees and completely drain the filter bowl empty.
This is the valve that you going to
remove to replace the internal o-rings. Leakage seems to have increased considerably with ULSD Fuel (Ultra Low Sulfur Diesel).
|
 |
Locate the small rubber hose that connects the steel drain line to the rear of the valve body. Pull the hose off of the valve, forcing it
straight towards the rear of the engine. Don's wiggle or pull sideways as you could break the nipple off of the plastic valve with too much
force. If it is stuck, try twisting the hose on the valve nipple to get it to break loose.
|
 |
With the short T-20 bit, remove all 4 screws holding the drain valve body to the fuel bowl. It may be helpful to try and lay out
some shop rags under the area that you are working so if you drop a screw you will not have to try and fish it out of the valley. It can be frustrating
when a small screw drops in one of the crevices that are hidden by all of the hoses and wires on the engine.
|
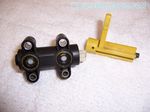 |
When you remove the valvebody from the fuelbowl, the yellow handle will most likely come off. It can easily be installed 90 degrees incorrectly when
reassembled, but I'll show you that later. If you have the original Ford o-rings, they may very well have this yellow flakey stuff all over them. This is a Teflon
coating that Ford had their o-rings coated with in an attempt to keep the Buna-N o-rings from swelling. You will see in this picture and the next how well this
coating has held up with ULSD.
|
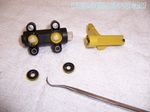 |
With a picktool, remove the old o-rings from their pockets. If your valve looks like mine, you will want to try and clean up as much of the Teflon flakes
that you can from the o-ring pocket, valve stem and fuel bowl body as possible.
|
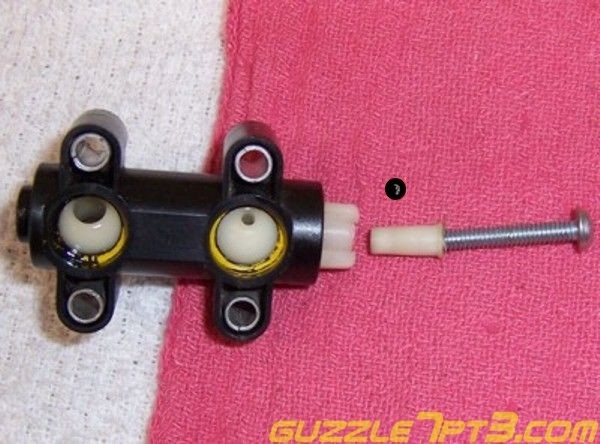 |
AH, but your not done yet, now comes the fun part because there is one more o-ring in this valve that is a little tougher to get to. There is a reinforcement piece of nylon in the top of the valve stem
that needs to be removed. Once this is removed, you will be able to grasp the top of the stem with a pair of needle nose pliers. To remove this tube, use an 8x32 machine screw and thread it into the reinforcment tube
just enough for the screw to grab. Pull the reinforcement tube straight out of the top of the stem.
Warning: The valve will have a small plastic ball behind this reinforcement piece. Do not loose it while
working on the valve.
|
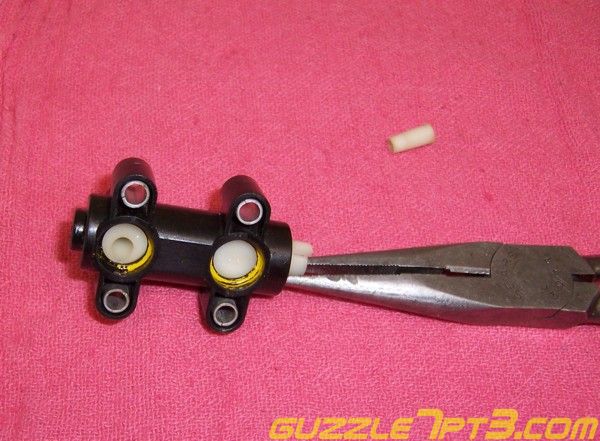 |
With a pair of needle nose pliers, grasp the valve stem and turn it 180 deg from the normally open position. It is a little tricky to the the stem in just the right position to allow it to be pulled from the valve body.
As you are turning the valve stem, look through the top opening on the valve body. When you have it positioned correctly, you will notice that the stem has a flat area on the ball. this flat spot must be perfectly
aligned with the valve body and you will be able to pull the stem out. The stem is a 3 piece part so if it separates just push it back together when you get all the parts out.
|
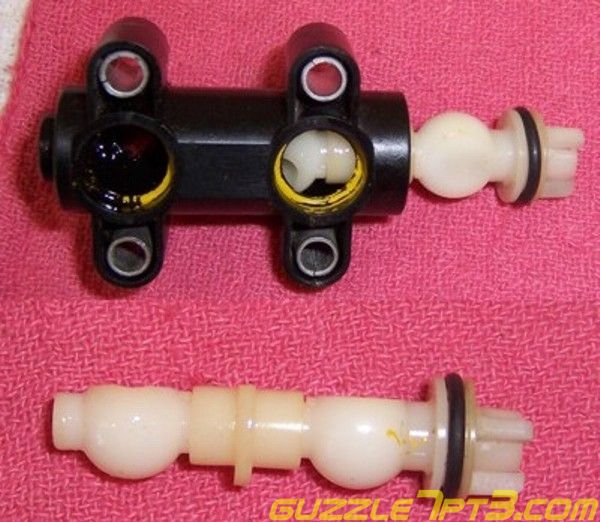 |
I removed the stem from the body so i could clean out all of the teflon coating residue left behind from the original o-rings. Using a little lacquer thinner on a rag, the valve cleaned up quickly.
Replace the o-ring on the valve stem, coat the o-ring area with a small amout ot light grease, Vaseline works well. Insert the stem back into the valve body and turn the stem so you can see both valve stem
holes through the openings.
|
 |
Use a little diesel fuel to coat the new o-rings before setting them in the valve body. It takes a little pressure to get them to fully seat so don't worry about
them falling out when you reinstall the valve on the fuel bowl. In this picture the ports in the drain valve are open, if you were looking straight into the o-rings, you
can see the hole in the valve stem. In this position, the yellow handle must point directly away from the o-rings to have the orientation correct for the fuel valve to
operate.
|
|
|
Place the valve in position next to the fuel bowl and start two of the screws in the fuel bowl by hand. Only tighten the screws very lightly until you have
all four screws in place. There probably is not enough room to fit an in/lb torque wrench in this small work area so I am only going to say to lightly snug the screws. If you
tighten them too much, it would be easy to crack the plastic screw ears on the valve. If you have the correct o-rings, it will not take more than snugging them up to
create a leak-proof seal. |
|
|
Re-connect the drain valve tube to the drain valve, close the drain valve and remove the hose from under the truck that you used to empty your fuel bowl. To test for
leaks, Turn the ignition key to the "ON" position without starting the engine. you will hear the fuel pump begin to run. Get out and look for any signs of fuel around the
back of the fuel bowl or under the truck. If you do this 3 or 4 times, getting out of the truck and looking for leaks until the fuel pump stops, this will also re-fill your fuel
bowl and purge it of air.
|
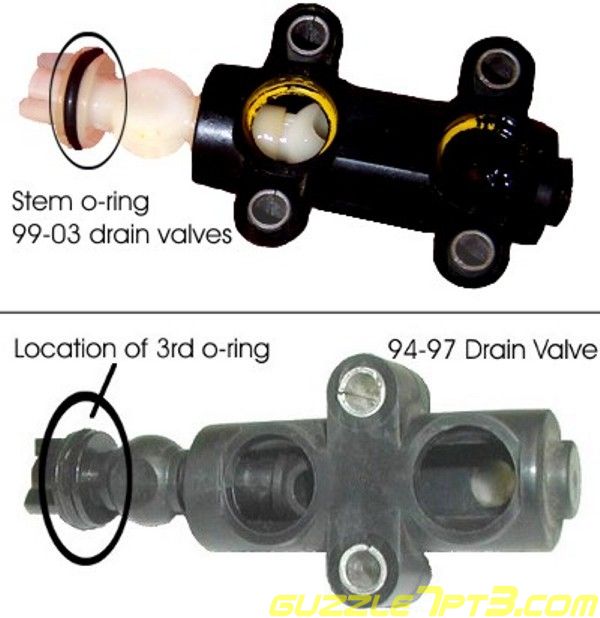 |
The procedure for the 94-97 drain valves is very similar. The difference is that the older drain valves are mounted to the fuel bowl with only 2 screws not 4.
You can get the fuel drain valve kits from my web store that have all 3 o-rings included for the E or F-series 94-03. Various choices of bi-monomer Viton, tri-monomer Viton, Mil-spec Viton or Mil-spec fluorosilicone,
all available at DieselOrings.com.
|
|
Once you have cycled your fuel pump a number of times, start the truck and examine the fuel bowl area and under the truck for any signs of fuel leakage.
If you find none, it's time to take the truck out for a test drive. Put on enough miles to get the engine warm and then check the fuel bowl area and under the truck
one last time for signs of leakage.
Clean up your shop tools and call it good. |
|
|
|
Back to guzzle's Powerstroke Maintenance Index |


)
)
)
)
)
)
)
)
)
)
)
)
 [ 206KB ]