|
|
|
The exhaust backpressure sensor and tube on the 7.3L Powerstroke engine is prone to clogging up with soot and can affect performance and mileage.
If your PowerStroke seems to be loosing mileage economy, this may be an item you should put on your list of "things to do".
According to Jody Tipton, DP Tuner: "a properly installed sensor in good working order is necessary for optimum PCM control of fueling."
Although the area around the EBP sensor is tight, this is a relatively easy maintenance procedure. The EBPS tube can crack or get pinholes in it, especially close
to the manifold connection, the more common problem is simply having the passage completely clog with soot.
Got a question? Contact me on my DieselOrings.com webshop CONTACT PAGE
|
[Click on a thumbnail to see a larger image - -
javascript must be enabled and popups allowed from this site]
|
|
 |
Parts used for this serviceUnless you are sure that the EBPS tube is cracked or the sensor is bad, you should not require any parts
for this procedure If the sensor is bad, the Ford part number for the sensor is 4C3Z-9J460-A. I have the sensors in stock also on my webshop
DieselOrings.com
If the EBPS tube is cracked or has
corrosion holes you can also order a new tube from DieselOrings.com - Ford part number is 1C3Z-9D477-AA.
|
|
 |
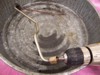
This picture shows the different sizes of the wrenches and sockets that will be used in removing the EBP sensor. With everything else metric, I was surprised
to find that the US standard wrenches worked the best on removing these parts. The sensor itself will require a 1" deep socket. The bracket nut was easy to hold
with a standard 9/16" open end wrench. The EBP tube nut required a 5/8" crow foot wrench as there was simply not enough room to turn a standard wrench and the
nut was too tight to use a shorty wrench. Once the tube nut was loose, the shorty made final removal easy.
|
|
 |
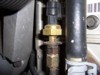
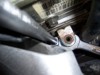
Removing the sensor and tubeLocate the EBP sensor. It is directly in front of the HPOP on the front of the engine, almost
centered. You will want to remove the plastic decorative engine
cover to gain access to this sensor.
|
 |
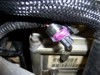
Unplug the sensor wires by lifting gently outwards on the locking tab while pulling it up. With a little wiggling, it will come out of the sensor body.
|
 |
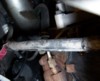
Use a 9/16" open end wrench to hold the bracket nut from twisting. A 1" deep socket will slip over the sensor body, allowing you to unscrew the 1/8" npt
threads from the bracket.
|
 |
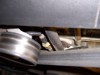
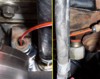
To break the EBP tube nut loose from the bracket, you will need the 5/8" crow foot wrench. Hold the bracket nut with a 9/16" open end wrench
while breaking the tube nut loose with the crow foot. If the nut won't break loose, spray it with a little PB blaster and allow to soak in for 10-15 minutes. Complete
the removal with a 5/8" shorty wrench.
|
 |
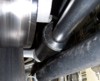
The EBP tube nut can be easily reached from under the truck using a standard 5/8" open end wrench. The tube can be removed for this location once the nut
has been completely removed.
|
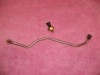 |
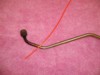
This is the EBPS tube and sensor removed from the vehicle. Inspect the tube for any obvious cracks or holes and replace as it will not be usable. Check the
sensor's opening to see if it is clogged with soot. There is a diaphragm in the sensor so avoid trying to stick anything in the opening more than 1/4" to clean it out.
The diaphragm can be damaged and rendered unusable if it is hit with a hard object or punctured.
|
 |
You can try pushing a wire or old piece of speedometer cable through the tube while spraying in down with brake cleaner. I had some heavy weedwhip
string that was rough sided that looked like it would do a nice job.
|
 |
Once I had the weedwhip line pushed through the tube, I hooked it to a cordless drill and slowly rotated it in the tube while spraying brake cleaner on the line.
Once I felt the tube was opening up well, I blew it out with compressed air, sprayed more brake cleaner and continued until the tube was clean. I used a new sensor
but if your sensor is clogged, use a small tool to try and dig out the sensor opening but not more than 1/4 inch into the sensor. Replace the sensor if it is packed with soot
more than 1/4" down.
|
 |
Don't forget to run something through the sensor bracket opening and manifold fitting to make sure that they are not packed with soot.
|
Once everything is cleaned and open, reassemble the parts in reverse order. It is much easier to begin by running the tube up form underneath the truck
and starting the tube nut on the manifold fitting. Before tightening the manifold, start the tube nut on the sensor bracket and then finish tightening on the manifold.
|
 |
Before connecting the sensor plug, coat the weather seal with dielectric grease to keep moisture from corroding the contacts. Since dielectric grease is
non-conductive, try to keep from coating the contacts on the plug.
|
|
|
Back to guzzle's Powerstroke Maintenance Index |


)
)
)
)
)
)
)
)
)
)
)
)
 [ 900KB ]